Showing posts with label Stampers Anonymous. Show all posts

Friday, August 11, 2017

King of the Road

Hi friends,-

I invite you to join me for a tutorial over at Elizabeth Craft Designs Blog where I will show each piece of the banner shown here and tell you how I made it.  See you there.


Ok, get that old Roger Miller song "King of the Road"  going in your head - - -
here are my new lyrics.
If you have ever been an RVer you will understand completely.

RV for sale or rent
No need for sleepin' in a tent
No phone, no pool, no pets
I aint got no internet.
It's an 8 X 12 with rooms that slide
Chairs that fold - so we can sit outside.
I'm a queen - by no means
He's the  -  King of the Road.

Happy Travels,
S@ndy

 -


Saturday, July 29, 2017

Saturday School week 7

Well here we are students,

This week, G is for Goat - the Hipsters are back!  Enjoy-


Since this is the last weekend of July I thought a red, white and blue theme would work one more time.  
  See you next week,
S@ndy

Saturday, July 15, 2017

Saturday School Week 5

Hi Saturday School Students, 

As much as I love the Hipsters, I'm taking a break for a couple weeks to share some other things made with items from my crafty stash.  The Hipsters will definitely reappear but for today, "D" is for dog.  As in Crazy Dogs.


Who wouldn't want to play ball with these crazy characters?

Have a wonderful weekend,
S@ndy

Saturday, July 8, 2017

Saturday School Week 4

Hi all you crazy students, today we are going to look at the letter "E".  As we all know, E is for eye chart.  Since all the Hipsters wear glasses what could be more appropriate?


This #hipforsummer thing has really been fun and I've seen some pretty amazing makes out there.  This week I decided to go a little crazy with the colors.

Hope you enjoy,
S@ndy


Thursday, February 16, 2017

Legit

Hi, just a quick stop today to share a card I made for our friends Herb & Gail.  They were telling us how each year their sister-in-law donates a goat in their name, in some poor country, for Hanukah.  While it is a very nice gesture, it struck me funny, so when I picked up these new Hipster Stamps from Tim Holtz I just had to make this card so they can send it to her. 
 
 
Stay Crafty My Friends,

Thursday, April 28, 2016

Tag Friday at A Vintage Journey

Hi friends,

Thanks for traveling along with us at A Vintage Journey where it's TAG FRIDAY.  This is always fun because the Creative Guides can make any tag they like with any theme that suits them.  Hope you will drop by for a visit and check out what everyone has made by clicking here.

The month of May brings many birthday celebrations to our home so I thought I would get started with my cards and tags for the occasions.  The tag I've made today will be added to the front of a card and sent to someone as a greeting.  Hope you enjoy the bright colors I've used on the balloons and cupcake while keeping the background in the vintage shades that we all love.


Have a crafty weekend,
 

Friday, August 28, 2015

Near or Far, Just Tweet!

Hi again my crafty friends,

I am stopping for a quick visit today to share a cute little creation using the Tim Holtz Crazy Birds
Stamps and Dies Set.  Also the Crazy Things Stamp Set which is so much fun.  I tried out a new technique, for me, on my last post which was to use stamped tissue paper.  I was happy with the face on my Steampunk girl so thought I would try it on a bigger scale. It worked beautifully.  I used the Tim Holtz "Enjoy the Journey" Stamp and Die Set for this one.

Near or far, just tweet!


After stamping the compass image on tissue paper, I embossed it with white embossing powder.  I added it using gel medium to a wood block that I had already painted blue.  Next I added more parts of the compass that had been stamped and embossed on blue paper.  I added feet to the block and a flower on top.  Below is a side view.

 
I really get a chuckle out of these birds and hope you do as well. 
Until next time-
Stay Crafty,

Thursday, June 4, 2015

Celebrations @ A Vintage Journey

Hi and welcome - today we are sharing the Celebrations of life over at
A Vintage Journey.  It is my turn to host and I invite all of you to show what you celebrate during the month of June.  Simply make something showing a celebration and link it up, you could be the lucky winner of a great prize.  You will, as always, be treated to awesome inspiration from the Creative Guides.  Your creation can celebrate the last day of school, a graduation, an anniversary, a wedding, Father's Day or a birthday.

I made a colorful accordion card using Tim's Birthday Blueprint Stamp Set from Stampers Anonymous and Karen Burniston's Katie Label Accordion Die from Elizabeth Craft Designs.


Here's How I Did It!

 
 I stamped the Blueprint Stamps on white paper.
 

I colored them with my Chameleon Pens and cut them out.

 
For the base of the card I cut the Katie Label Accordion four times from manila cardstock, stamped the panels and connected them together. 
I edged the entire thing with Mermaid Lagoon Distress Ink. 
Next the colored pieces were added to the panels


After cutting the Katie Stars Frame Edges from 4 different colors they were added to each panel.  The final step is to connect the panels with the tabs making the accordion.


Celebrate something special in June-

Thursday, May 14, 2015

My Friend "The Crazy Cat Lady"

Hi my friends - hope all is well in your world.  Today I am stopping by with a card I made for my friend, Mary, who loves her cat.
 
I got these fun stamps a few weeks ago and just love them so had to make a card.  The set is designed by Brett Weldele and is from Stamper Anonymous.  The finished card is 6" square.  I used papers from my stash and think most of it is DCWV.  I colored the cute cat with PrismaColor Pencils to make him the same color as hers. Mary's favorite color combination is red, white & black. 
 
Hope you enjoy -


Stay crafty,
S@ndy


Sunday, May 10, 2015

May Flowers

Hi my friends,

It seems that May flowers are the topic for many challenge blogs lately so thought I would try to make one project to cover several challenges today. 
 
I have used the Wendy Vecchi Art Parts Timely Pocket Watches and then used the techniques she shared on her blog here.  Wendy used embossing powder and then while it was still hot, added some foil.  I like the way it looks as if the gold has worn off and it now has a great patina.  I used one of Tim's stamps from Stamper Anonymous for the sentiment.  I will be adding my link to the Make Art Challenge Blog where the theme is "Flowers".  While I'm at it - I'll link up with the
Mixed Media Monthly Challenge Blog where they are asking for "May Flowers".  Since I did use Abandoned Coral - I'll add my project to the Simon Says Stamp Monday Challenge where they are saying "Don't Abandon the Coral".  Last but not least is the Wednesday Challenge over at Simon Says Stamp Wednesday Challenge and they want "Let's Get Sentimental".


For the flowers, I used a technique that is one of my favorites.  I used the Tattered Florals Die and cut my flowers from vellum.  I mixed my own color into a spray bottle using Abandoned Coral reinker, Heirloom Gold Perfect Pearls and water.
After spraying the flowers with the mixture, I dried then with the heat tool and as they dried, they curled.  I always love these flowers and have used them on several projects.
 

This is a rather messy process so if you don't like to get your hands messy and stained, don't try this at home.


I was pretty happy when I got to this point but felt it needed some finishing touches.
I went stash diving and came up with some cute elements to add.  The cute little bird is one from Dina Wakley that I had colored and not used.  He was perfect for this project so used him along with some more branches cut from the Branch Tree Die.  I then finished it off with a chain and metal tag that says "Believe".


Have a wonderfully crafty week,
S@ndy


Thursday, April 30, 2015

Party Line

Hi Vintage Journey Fans
 
We are starting a new month and a new challenge at A Vintage Journey with our lovely hostess, Astrid, who chose the theme "Spring Colors".  Or as they spell it over there, colours.  Using the grunge factor from Tim along with his stamp set, Bird Crazy,  I had lots of fun with this one.  I've been playing with these crazy birds for weeks now and I still have some ideas going round in my head.  I'm sure they will be popping out soon.
 
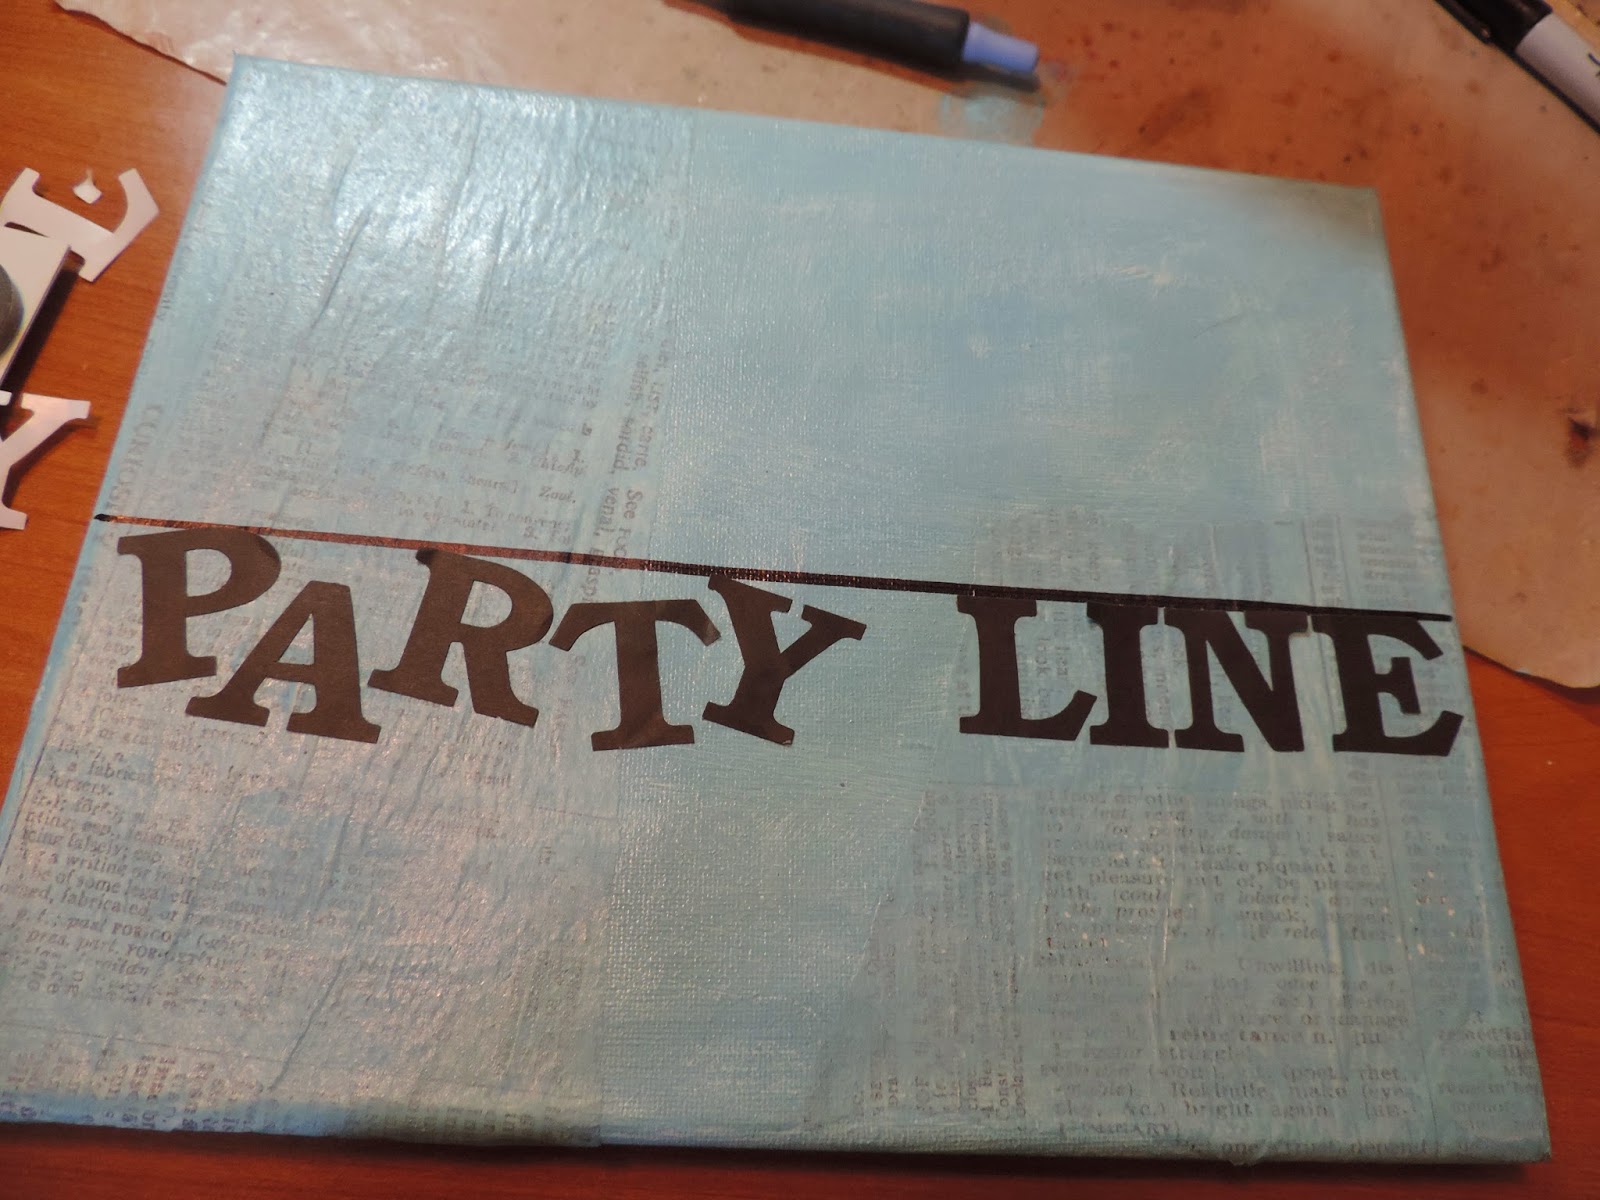
I know I'm dating myself by using this old fashion term but I just had a thought and went with it.  I hope I am not the only one who remembers the "party line" where we shared a phone line with our neighbors.  I thought I would put a different twist on the term by combining it with "party" birds on a wire. 

These birds are ready for a celebration with their noise maker, party hats and balloons.
I used the Props Die Set from Karen Burniston for the party goodies.

Here's how I did it!
 
 I started out with a canvas, added gesso and some tissue wrap from Tim's collection.
 
 Next came a layer of Distress Paint.  I used Broken China and Peeled Paint.
After dabbing it on my canvas, I rubbed it around with a baby wipe.
 
 I drew a line using a sharpie and T square, then added the lettering from some I had in my stash.  I later added  some white lines on the letters using uni-ball Signo Pen.  Last step for the lettering was to cover it with Wink of Stella.
 
I stamped my birds on manila paper and then colored them very quickly using two colors of Distress Ink on each one.  I applied the ink with dabbers and then went back with black and white to highlight some spots after cutting them out.
 
After laying out the birds the way I wanted them, I stamped them on the canvas to get the tops and legs that were previously cut off.  Then the colored bodies were glued on.
I thought they were looking a little bit like they were floating so I used a stencil and some molding paste to add the tree at the bottom of the canvas.


I hope you have enjoyed my silly take on the theme this month and you will stop by A Vintage Journey to see all the fabulous projects from the rest of the team.
 
Have a great month and don't forget to join the fun by posting your Spring Colors (colours) make with us.


Sunday, April 26, 2015

All a twitter -

Hi my friends,

I took a Twitter class recently and have been thinking about all the things I learned.  I've had some time to play and have been so enamored with the Bird Crazy Stamp Set - from Tim Holtz,  I just had to use them again.   This week the challenge over at Simon Says Stamp Monday Challenge Blog is Anything Goes so will add it over there.
All I can say is TWEET THIS!!


I  had some funky little eye glasses (a brad) in my stash so added them to the bird.  I made the "word balloon" and then added it to the bird with a small piece of acrylic to make it look as though it is floating over his head.  Some wire for his top knot and some #'s and @'s and of course the Trophy Cup.  He's ready to tweet.
 
Have a fun and creative week,

Saturday, April 11, 2015

Steampunk Bird Crazy

Hi my blogger friends,

Today I am simply playing.  Yesterday I shared a card with the Burly Chef, today I've gone to the birds, Bird Crazy that is.
 
I have to admit that when I first saw these stamps I thought I didn't like them.  Well, let me tell you that I have changed my mind in a big way.  Now I can't seem to get enough of them.  This week over at Simon Says Stamp Monday Challenge  the theme is "In the middle" so will be adding my little birdies over there.
 
I made my crazy birds into steampunk birds and every time I look at them I get a giggle.   Hope you do to ---- 
here they are:


I have another idea cookin so I may see you tomorrow! 
Have a wonderful weekend,

Friday, April 10, 2015

Hey There Cupcake!

Hi friends,

Just stopping by today to share a card that I just finished.  I  got some new stamps in the mail yesterday from Stamper Anonymous so of course had to get out the ink.
 
The set I used here is from Brett Weldele and is called "The Burly Chef."  I used the Rectangle Pull Card by Karen Burniston and Elizabeth Craft Designs for the card.
The cupcake stamp is one from my collection from Close To My Heart.
 
I like the way it turned out and thought you might like to see it.


Have a great weekend,
 

Saturday, April 20, 2013

Let's take a "Road Trip"

When I was at CHA this past January I saw the Tim Holtz Configurations Book and fell in love with the idea of a story contained in a box.  Here are a few pictures of my idea - hope you enjoy.


For the front cover I used a real map from an old Atlas attaching it with Glue N Seal.  You will notice lots of Tim Holtz goodies in this project because they just lend themselves to the theme.  In fact one of the stamp sets is called Road Trip.  When I stamp an image I like to use black ink and emboss with clear.  It seems to make the image stand out.  I can always find a use for gears from the Gadget Gear Die.

The book is held shut with a Swivel Clasp and a Hitch Fastener, so glad they are back on the market.  

On the other side I double stamped the tire treads using Tim's Road Trip Set from Stampers Anonymous, I like the way it looks as if a car ran over it.


The back is covered with a complete sheet from Tim's Paper Stash.

Now for the inside -  after  arranging the boxes so the Vintage Valise would fit inside I glued the boxes in and covered the edges with Tissue Tape then inked them with Vintage Photo Distress Ink.  I found some great paper at Michael's for the inside front cover but all the rest is from Tim's collections. I used many dies and findings.  Mac found a spark plug at Home Depot for me.  It is actually for a lawn mower but it fits perfectly and it even says Champion on it.  It was a great finishing touch. 


The Vintage Valise opens to reveal a pull out scrapbook.  I used Tim Holtz Paper to matt each page and then added some stamping and die cuts.  Two of my favorites are the Old Jalopy and the Vintage Camera. The suitcases are from Time Travelers, Tim Holtz/Stamper Anonymous

It is easy to flip the pages back and forth while leaving them in the box or they can be pulled out (still attached to the Valise) in a long strip as shown below.