Showing posts with label Ranger. Show all posts

Thursday, February 1, 2018

Melt it at A Vintage Journey

Hi friends,

Today is the start of a new challenge at A Vintage Journey.  I hope you will stop by to see all the great things the Creative Guides have made to inspire you.  You can see it all by CLICKING HERE.  Our challenge this time was "Melt It".
I made a simple yet colorful tag and used embossing powder in two different ways as my "Melt It" object.


This a rather simple tag with lots of color.


I began with a manila tag, then added Distress Oxide Inks, Candied Apple, Spiced Marmalade,
and Wild Honey.


I stamped on the phrase and little butterfly from the Elizabeth Craft Designs Plant, Grow & Bloom stamp set using VersaMark Ink and then some Bravo Burgundy embossing powder from Stampin' Up. 


I cut a Dotted Scalloped Circle, cut in half.  It was embossed with Karen Burniston's Butterfly embossing folder(discontinued) and then colored with Wild Honey Distress Oxide and then edged with Frayed Burlap Distress Oxide.


For the butterfly, I used the Elizabeth Craft Designs Butterfly 1 die set (discontinued).  I colored the solid one with Broken China Distress Oxide Ink and the lacey butterfly was covered with VersaMark Ink and then covered with gold embossing powder - heated to melt the powder.


The final step was to layer everything and tie a ribbon on the top.

I hope you will join the fun and enter this month's fun challenge.  You can do that by

See you Monday with a fun tag.  Until then - have a creative weekend,
S@ndy
Friday, October 27, 2017

Find Your Muse

Hi friends and welcome,

I recently had an opportunity to work with some great products from

emailsigmerchandise
printables for mixed media and collage

These are wonderful prints that stir the imagination, available here. 

If you are not familiar with Mixed Up Magazine, it is a fabulous digital magazine issued every two months that is packed with wonderful projects, tutorials and videos.

I love vintage so this was the perfect chance to make something with that vintage feel.  


If you care to stick around for awhile, here are some photos from the process. All products I used are linked at the end so you can shop easily.  Simply click on the link for all the important information.


I began this tag by cutting a piece of chipboard that measured 4.5" X 9.25".  Then an Antique Book Page was glued on.  I placed a tag die at the top of the panel knowing that the die would not cut through the chipboard because it is a wafer thin die.  It was run through the die cutting machine and it left an impression that I could follow and cut by hand leaving a perfect design.  


After cutting, it was sanded and then a light coat of Oxide Vintage Photo Ink was added.


Because the goal was to push the print further into the background - the entire tag was covered with modeling paste and then wiped off with a flat surface (an old credit card or gift card). This process pushed the print to the background leaving a white film on the tag.  More Vintage Photo Ink was added, heavier around the edges.


Next the desired pieces were fussy cut from Cabinet Card-Maggie,
Printable Thoughts and Flowers #1.  They were then edged with Vintage Photo.


Using 2 sets of Architextures from 7 gypsies - I added them on the right side of the tag.  Using foam tape to give dimension the Printables were added.


For the finishing touches, some small beads were added to the center of two flowers and then a golden shadow was added all around the main images using a water brush with some Wild Honey Distress Ink. A hole was punched near the top of the tag then twine and a Word Token was added.

Happy Crafting,
S@ndy
emailsig

Saturday, July 29, 2017

Saturday School week 7

Well here we are students,

This week, G is for Goat - the Hipsters are back!  Enjoy-


Since this is the last weekend of July I thought a red, white and blue theme would work one more time.  
  See you next week,
S@ndy
Thursday, June 1, 2017

New Challenge at A Vintage Journey - Canvas

Hi fellow travelers, 

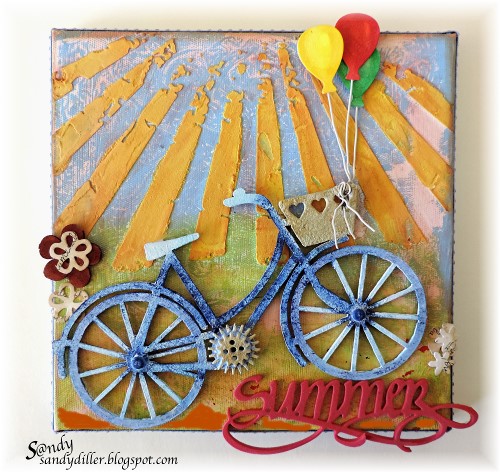
Today is the start of a new challenge at A Vintage Journey and our lovely hostess, Nikki, has asked us to use canvas.  I chose to use a small canvas from my stash that I got at a flea market, it already had something on it but not something I wanted.  I simply put a coat of gesso over the old and started the new.

My canvas is the celebration of Summer.  A time when the kids are out of school for awhile and things are a little easier.


 We have a wonderful sponsor and giveaway this month.


We would love for you to join us for this fun challenge.  Just click here and then follow the Inlinz prompt to submit your entry.  Good Luck! 
 
The randomly chosen lucky winner will receive a $25 voucher to spend in their store.

Here are a few steps that I took to create my canvas.
 

Starting out with a Gelli Plate, spread green and blue paint.  Next lay a stencil on the paint, the pattern really doesn't matter as it is only used to give some random texture.
Place your canvas face down on the painted surface and press down so the paint transfers to the canvas.

 
Let paint dry, mix up some texture paste with color of choice.  For this canvas I wanted sunshine so I used Distress Oxide Fossilized Amber reinker to color my paste.  Next spread the colored pasted through a stencil.  I used a Tim Holtz stencil here to create my sunshine.
 

While you are waiting for paste to dry, begin getting all the other elements ready to add.  This cute little bicycle is from ClearScraps. I added a couple gears from Tim Holtz and then a coat of gesso.    Truthfully,  I did a few colors before I came up with what I wanted.  You can change colors as many times as you like by simply adding another coat of gesso and starting again.  In the end I got the effect I wanted by stippling the colors on.
 
For the finishing touches - some small flowers and balloons were added using some dies from Karen Burnistion's Pop it Ups collection from Elizabeth Craft Designs.  The balloons are added using wire and then wrapped through the basket on the bike.  The word "Summer" was cut from fun foam using an Elizabeth Craft Designs die from the A Way With Words collection.

 
Please hop on over to A Vintage Journey to see what the team made for this great challenge,
 it will be worth the trip,
S@ndy
Tuesday, April 11, 2017

Paper Pros Challenge

It's time once again for the Paper Pros monthly challenge and the thing I love about this is that there are no rules, no theme and no pressure.  Today I made a card using some Karen Burninston Pop it Ups dies a tag topper from Elizabeth Craft Designs and lots of Tim Holtz Remnant Rubs along with the Oxide Inks that everyone is so in love with.
 
 
I had some fun while making this card because I was never sure where it was going to end up but I like the results.
 

Starting with a folded standard card 4.25" x  5.5".


Next came the fun of using the new Ranger Oxide Distress Inks.  I put a few colors on a non stick craft mat, spritzed with water and then dragged the card through it. 
 
When I was happy with my color, I placed the Tag Pivot die on the center aligning the nibs of the die with the center fold.  After running it through my die cutting machine I folded the pivot toward the center of the card.
 
 
I used parts and pieces of several Remnant Rubs as desired.  The hot air balloon is one of Karen Burniston's - Hot Air Balloon Pop Up Card.
 
Have a great week,

Thursday, March 9, 2017

A Play Day for Me

Hi friends, 

Just a quick stop today - I have been playing in the studio and decided to join in a few challenges that are currently going.
 
For the Simon Says Stamp Challenge they want us to make our own background.
For Creative Carte Blanche, Its All About The Numbers.
For Emerald Creek Dares says -Splatter Some Fun
And Mixed Media Monthly says - Buttons
 
 I did a big chipboard tag with several tags added for a colorful and playful creation.


This was fun for me because I could just do as I pleased and that is just what I did.  For the main focal point I used a printed canvas from Dylusions.  I used the colors in the canvas as my start.  I must confess I did some stash diving and came up with some tags that were just laying around. After adjusting the colors a bit - they were perfect. 
 
 
I found this tag that was rather too orange for me and sprayed it with Memories Mist, Iced Coffee.
 
 
The background was made by putting some embossing paste through a Tim Holtz Layering Stencil.
When that was dry, paint was added.  It is hard to explain this process as we all go at it in a different way but I used several colors.  Some of the paint was wiped away before it dried to reveal the stenciled numbers.
 
 
After much playing and decision making on which embellishments to use - everything was glued in place.  In order to add the splatters, the main image was covered and then the splattering began.
 
 
I used some Media paints, some Tim Holtz Grunge Board elements and the end of a ticket from my idea-ology stash, some of Tim's Remnant Rubs and a star button.
 
Thanks for stopping by -
Enjoy your day,

Thursday, March 2, 2017

Anniversay Celebration at A Vintage Journey

We are celebrating our third anniversary over at A Vintage Journey.   All Aboard - to see what the Creative Guides have made for the occasion.  Simply Click here.

This time around we were challenged to make anything we like.  I made a tag in anticipation of Spring with some bright - yet vintage colors.   Nothing says spring like the arrival of flowers. Enjoy!
 
 
The challenge over at Simon Says Stamp Wednesday Challenge is Tag You're It.
I will be adding my tag there as well.
 
While I'm at it, I'll add this spring tag to the challenge over at Frilly & Funkie.
They are having a Welcome Spring Challenge.
 
Here are some highlights -
 
 
I made my own tag by cutting a strip of manila cardstock 3.75" X 12".  I placed the tag top through the Dotted Scallop Circle die, from Elizabeth Craft Designs, as shown above and ran it through my die cutting machine.  After the top was created, I trimmed the tag to 7" long.
 

Using Distress Ink with an ink blender - color was added.  I used Abandon Coral, Fossilized Amber and Twisted Citron.

 
When the color was what I wanted, I ran the tag through my machine with an embossing folder designed by Karen Burniston called Trendy Tiles.

 
Next the flowers were cut using the Lacy Poppies die from Elizabeth Craft Designs.  Then they were colored using Copic Markers and a little shimmer from A Wink of Stella.

 
For the ribbon I colored some Tim Holtz Crinkle Ribbon using the Twisted Citron reinker.  To do this, drop some reinker on a craft mat, add some water to the ribbon and the ink.  Dip the ribbon into the ink until it is colored.  Dry with a heat tool.
 
Now all that is needed is to assemble -
 
 
Enjoy your weekend,