Showing posts with label Gelli plate. Show all posts

Thursday, April 2, 2020

It's Gelli Plate Time

Hello fellow travelers,

It is the first Friday of the month and that means a new challenge at A Vintage Journey.  This month our lovely hostess, Julia, has decided that it is time to get out the Gelli Plate.  I must admit that I have owned a Gelli Plate (two actually) for some time but never seem to get them out to play with.  I'm so happy that now is the time!  I hope you enjoy my adventure - at this time we are all struggling with the coronavirus thing so I thought a little silliness could lift our spirits.  There is no reason for this journal page except to use the Gelli plate and to add some happiness to our lives.


 Even though I don't use my Gelli Plate much, I like to watch YouTube videos about it.  I have recently been watching videos about Distress Oxide Inks with the plate so thought I would give it a try.  You can pick any two, or more, colors and simply rub the ink pad on the plate.  Once that was done, I used a brayer to smooth out the colors.  Next I spitzed water on the whole thing   Next I layed the paper on the plate and pressed it down.


I did this several times using different color combos.  On the top row you will see how the water has made some interesting marks  Without doing anything else to the plate I put a new sheet of cardstock on the plate and lifed another print, called a ghost print, you can see those on the bottom.

 For this double page spread in my art journal I decided to use two of the ghost prints.

 The next step was to do a little stenciling, I used some Seedless Preserves Oxide Ink and one of the Life Changing Brushes from Picket Fence.  

 I recently bought an adorable stamp set from Pink Ink Designs (a British Company).  I stamped the bunny and colored him with some Copic colors. Couldn't be any cuter.  The stamp set comes with lots of great images and I tried to use most of them.

 I cut out the bunny and placed him on the page with matt medium. I made my pages separately and then placed them in my journal using Clear Double Sided Adhesive from Elizabeth Craft Designs.

A little more stenciling with a different stencil at the top of the page to add another layer.

I added more images from the stamp set and then some random stamping for the background.
Next came some white spots using watered down gesso.

Just for fun I added Hop, Hop Hooray.
To finish the pages off, some more bunny images from the stamp set were added. I added a grass edge along the bottom and then edged all around with Oxide Ink.

The final step was to add some Wendy Vecci Translucent Embossing Paste for a little added texture.

This was a fun page and I hope you have enjoyed it.  Get out those Gelli Plates and start printing.

See you again soon,
S@ndy 

Thursday, June 1, 2017

New Challenge at A Vintage Journey - Canvas

Hi fellow travelers, 

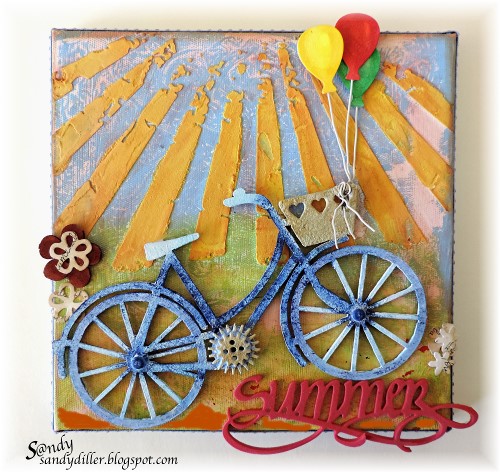
Today is the start of a new challenge at A Vintage Journey and our lovely hostess, Nikki, has asked us to use canvas.  I chose to use a small canvas from my stash that I got at a flea market, it already had something on it but not something I wanted.  I simply put a coat of gesso over the old and started the new.

My canvas is the celebration of Summer.  A time when the kids are out of school for awhile and things are a little easier.


 We have a wonderful sponsor and giveaway this month.


We would love for you to join us for this fun challenge.  Just click here and then follow the Inlinz prompt to submit your entry.  Good Luck! 
 
The randomly chosen lucky winner will receive a $25 voucher to spend in their store.

Here are a few steps that I took to create my canvas.
 

Starting out with a Gelli Plate, spread green and blue paint.  Next lay a stencil on the paint, the pattern really doesn't matter as it is only used to give some random texture.
Place your canvas face down on the painted surface and press down so the paint transfers to the canvas.

 
Let paint dry, mix up some texture paste with color of choice.  For this canvas I wanted sunshine so I used Distress Oxide Fossilized Amber reinker to color my paste.  Next spread the colored pasted through a stencil.  I used a Tim Holtz stencil here to create my sunshine.
 

While you are waiting for paste to dry, begin getting all the other elements ready to add.  This cute little bicycle is from ClearScraps. I added a couple gears from Tim Holtz and then a coat of gesso.    Truthfully,  I did a few colors before I came up with what I wanted.  You can change colors as many times as you like by simply adding another coat of gesso and starting again.  In the end I got the effect I wanted by stippling the colors on.
 
For the finishing touches - some small flowers and balloons were added using some dies from Karen Burnistion's Pop it Ups collection from Elizabeth Craft Designs.  The balloons are added using wire and then wrapped through the basket on the bike.  The word "Summer" was cut from fun foam using an Elizabeth Craft Designs die from the A Way With Words collection.

 
Please hop on over to A Vintage Journey to see what the team made for this great challenge,
 it will be worth the trip,
S@ndy

Thursday, October 29, 2015

3D Tag Friday at A Vintage Journey

Hi everyone and welcome-

Today is the 5th Friday of the month (if you're on London time) and that means TAGS at A Vintage Journey.  The team has really gone the extra mile this time with some fabulous tags.  Please stop on over by clicking here to share in the creativity and fun.
 
For my tag I, of course, went with Halloween.  I have a large box of extra Configuration Boxes and sometimes like to use them on a small project like this one.  I gave my tag a 3D treatment by using a chipboard tag and a Configuration Box. 
 
 
 You can see Tim's influence everywhere in this project.  I have been playing with my Gelli Plate and used it to make the background then added some stamping on top.
 
This project will be perfect for the Anything But Cute Challenge where they are asking for a Halloween theme as well as the use of the number 31.
 
They are having a throwback at Simon Says Stamp Monday Challenge so I went with  October 2013 “Spooky”.
 
Hope everyone has the most spooky Halloween ever and thanks for stopping by,