Showing posts with label Graphic 45. Show all posts

Friday, August 10, 2018

Royal Castle, Sand Castle - Haunted Castle


Hi Friends,

Today I'm sharing a card I made with Karen Burniston's Castle Pop Up die set.  I love getting many uses from my dies so I try to think of unusual ways to alter them.  This little project turned out so cute, I just love it and hope you do too!


I left the front of the card very simple because as you can see, the fun is all on the inside!!


You can shop for any of the items I used by clicking the links below.

Have a Crafty Weekend,
S@ndy

Tuesday, September 12, 2017

Paper Pros Challenge - Halloween

Today I'm participating in the Paper Pros Halloween Challenge.  Our group is a no pressure kind of thing so it is always fun to make any card you like.

This month I combined several of the new dies just released by Karen Burniston.  The two dies that make this card work are the Katherine Label Pop-up and the House and Fence Pop-up Die Set even though I didn't use the house, just the floating floor from the set.


 The finished size of my card is 5" X 5".  I did start out with a larger card base and then cut it down once I had the pop-up and floating floor installed.


Cut 2 Trees from the Halloween Scene
Cut 3 graveyards from the Halloween Scene
Cut 1 bat from the Halloween Scene
Cut 2 ghosts from the Halloween Elements
Cut the BOO! from the Halloween Elements (not shown)
Cut creepy hands from the Halloween Elements (not shown)
Cut 1 crow from the Halloween Elements (not shown)
Cut 2 fences from the House and Fence die set
Cut floating floor and 4 tabs fro the House and Fence die set
Cut the Pop-up portion from the Katherine Label set
The moon was cut with a circle die using some Graphic 45 paper.

I have cut a floating floor from a light color cardstock so you can see the modification that is needed to accommodate the pop-up.   The dotted line is the original score line - I added a line that is 1/4" beyond the score line and then cut it all away.


Add the pop-up from the Katherine Label set to the fold of the card as close to the center as possible.  For instructions on how to cut, fold and add this pop-up simply click here.

Before adding the floating floor to the card, make two additional slots, I cut them by  hand.  Place floating floor in card, click here to see instructions.  Add the tabs to the slots.

You can now begin adding the rest of the embellishments.  I added two trees, I also added one complete graveyard and then cut another one apart to add to the extra tabs.  The two fence sections were glued together and added to the front of the floating floor.


For card front:

Since all the fun of this card is on the inside I kept the front very simple with a little lead in using some Graphic 45 paper.


See you soon and stay crafty,
S@ndy
Wednesday, March 1, 2017

Pop it Ups Wednesday

Hi my friends, today it is my turn to share a card on the Elizabeth Craft Designs Blog.  I have a Pop it Ups card using the Hanging Charm Pull Tab die designed by Karen Burniston. 
 
I used the Steampunk Debutante Paper Collection from Graphic 45 which I have been hoarding for awhile.   
 
To see a complete tutorial on how I made this card simply click here.


Enjoy your day,

Sunday, February 26, 2017

Pop it Ups Card using Steampunk Debutante Paper Collection


Hi friends and welcome back.  Today I'm here to share a card I made for our friends anniversary.  I have decided to break out my stash of Steampunk Debutante Paper from Graphic 45 - which I have been hording for awhile.  I made two cards, one I'm sharing today using the Rectangle Pull Card, the second one will be on the Elizabeth Craft Designs Blog on Wednesday where I'm sharing a tutorial for a Pop it Ups card using the Hanging Charm Pull Tab designed by Karen Burniston. 


On the front of my card I used an image from the Steampunk Debutante paper collection along with some gears (or cogs) from the Steampunk Charms die and the Clocks and Gears die all designed by Karen Burniston for Elizabeth Craft Designs, the Happy Anniversary is from Elizabeth Craft Designs.

 
The Rectangle Pull Card comes with this nifty piece for the inside of the card that makes what ever is added to it pop up.  I added 2 top hats from the Steampunk Charms die set.


The hats were added with a piece of clear acrylic packaging so it appears that they are flying.
Print sentiment on computer and add to card.


These cards are fun and easy, simply line the center nubs of the die on the fold of the card.  The card can be any size you like.  This one is 6" X 6".

 
Add the tab on the center fold.

 
Add hats and finish decorating as desired.
 
Have a creative week and hope to see you on Wednesday,

Thursday, May 5, 2016

Sew Special

Hi and welcome,

Today we begin a new challenge at A Vintage Journey - Sew Special - where our lovely hostess, Jenny, is asking us to use fabric on our project.  I used a burlap panel from idea-ology for my base and, of course, went with the sewing theme.


The first step was to stencil the ruler on, I used molding paste and the Measured Stencil.
 
 
After stash diving for sewing things, I found this dress form, sorry I don't know where I got it. I edged the dress form and a piece of torn paper with Vintage Photo Distress Ink.
 

    Next the form and paper were added to the canvas


                                                 An empty bobbin was glued to the top

 
I had no pink ribbon so died some seam binding with Spun Sugar reinker and water. 
This is easy to do by simply dropping some reinker on a non stick mat and then adding a few drops of water.  Wet the ribbon, add it to the ink and then dry with a heat gun.

 
Next came a length of lace from Graphic 45, then the ribbon was added.   Tie a bow and add some pretty flowers.

 
Using Sewing Room Die - cut one dress form with Honey Pop Paper (Inky Antics) and one from chipboard.  Add double sided adhesive to both sides of Honey Pop form.  Remove liner from adhesive and stick to half of chipboard form.  Add form to burlap panel and then remove adhesive liner from other side of Honey Pop then stick down.
 
 
Final step is to add scissors from Sewing Edge Die, a few buttons, and a phrase banner.
 
Hope you will stop by the Vintage Journey blog by clicking here to see what everyone made and to join the fun by posting your Sew Special project.
 
Have a great weekend,


Thursday, February 4, 2016

Industrial

Hi all and welcome to a new challenge month at A Vintage Journey.  This month our hostess chose Industrial.  What a great chance to use some of my favorite things including a fabulous image from Graphic 45's Steampunk Debutante Line.  I had so much fun creating this canvas - hope you enjoy it.


First few steps were, of course, gesso, paint and some gears glued down to the canvas.  When all that was dry, I used the Measured Layering Stencil to create some random numbers and lines.


I found the image I wanted to use, cut it out and mated it with black.  I didn't stop there.
Next I added a crown to the bird in the background, stamped some little flowers around the bodice, added Glossy Accents and some Remnant Rubs to the small bird, a pearl bracelet and  some Stickles in her hair.  This is a fun way to add some interest and dimension to a print.
 
 For the final step I added some black Gadget Gears held on with brads,
 and a faucet handle to the top.  
Hope you will join this months challenge and have some fun with the Creative Guides over at
 
Have a wonderfully creative weekend,

Sunday, January 24, 2016

Destintation Inspiration at A Vintage Journey

This week it is my turn to share a project at A Vintage Journey.  Each month 4 of the Creative Guides take you on a little adventure where we are challenged to use the same items in different ways.  This month we packed:

 Product : Archival Ink
Technique : Stamping
 Color: Dusty Concord
                                   Substrate : Acrylic/Clear Packaging/Acetate

I hope to see you at Terminal 4 where you will get a complete tutorial on how I made this:


Have a wonderfully creative week,
S@ndy

Friday, October 10, 2014

Happy Haunting

Hi Everyone,

Just a fly by to wish all of you a crafty weekend.


Get out all of those Halloween things and make something fun!
 

Monday, June 16, 2014

Karen's Challenge for June

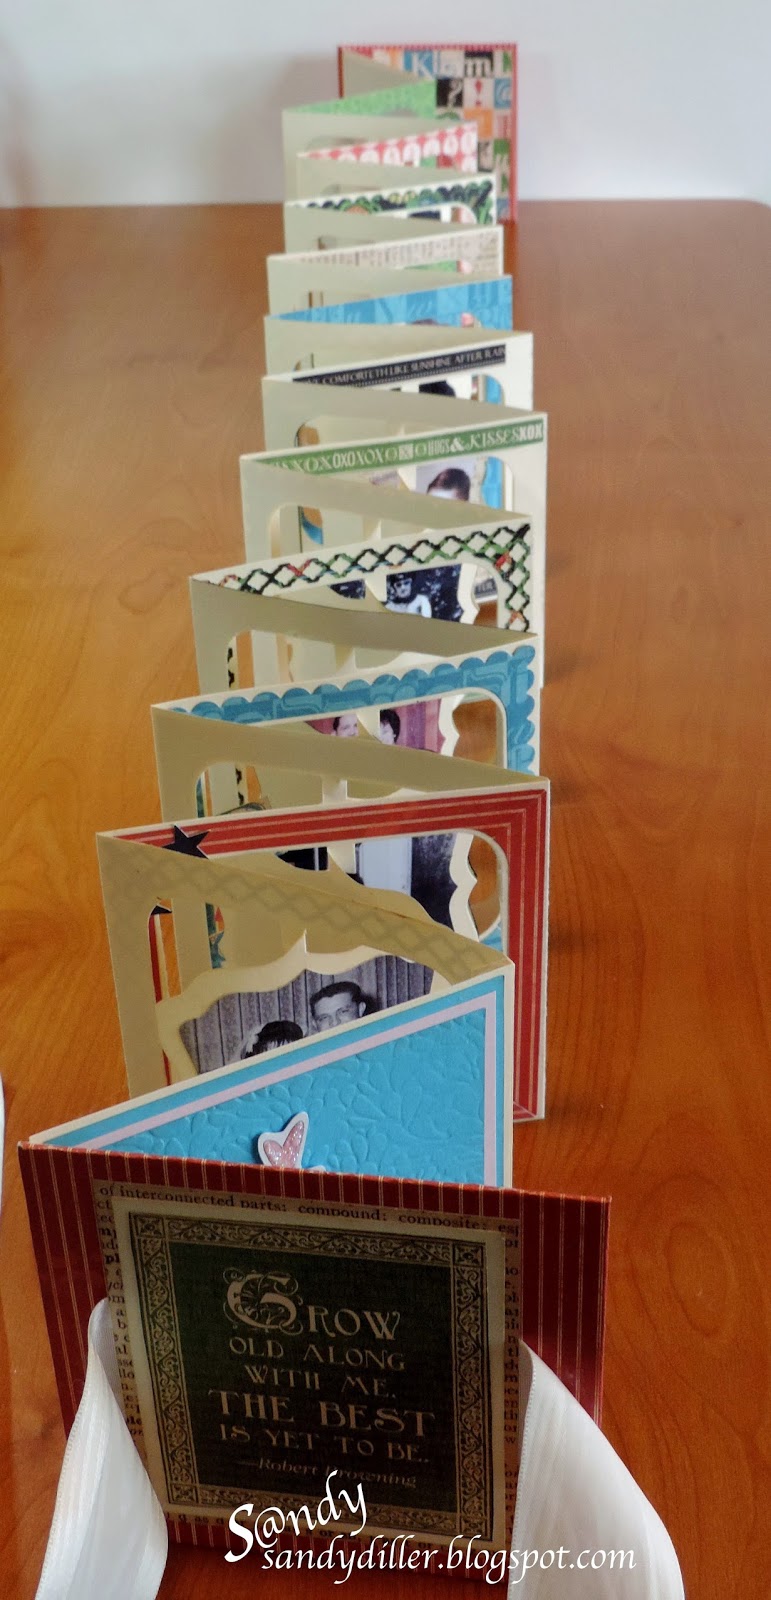
Hi all and welcome - this month Karen Burniston told us we could use any of  her dies for our projects.  Her only request was that we use a photo.  I used the Accordion Fancy Label Die #771 from Elizabeth Craft Designs.   I took her request to the max this time.  Since this challenge falls at the same time as our anniversary of 50 years I decided an album was in order.  Ok, I promise this is my last anniversary post but hope you will enjoy this little stole down Memory Lane. 


I used the Ty-pog-ra-phy Paper Pad from Graphic 45.  Among the papers I found this fabulous quote by Robert Browning that is so appropriate.  This is a nice little book full of photos of our family as they grew up and we grew older (not old).  When you open it, the best is yet to be.


I had a Lazy Susan that fit the book perfectly when opened.  I think it looks like a star book and makes a nice display.  You can move the pages around to see the photos  easily and it is contained. 


When the ribbon is untied and the book is not contained by the Lazy Susan - it looks like this.

I've had this idea for quite some time but until now it has not made its way to paper.  It's kinda like having a song stuck in your head.


Here are a few photos of it along the way- I started with 20 panels from the die and a solid panel for each end.  Then two chipboard panels for the covers.


After connecting all the panels together and while flat, I decorated each one like a scrapbook page.  After decorating them, I connected all the inner panels together as per the instructions for making any other card (a very long card).

I'm off the see what the other DT members made this month - hope you have enjoyed.

Have a great week,
S@ndy

Sunday, October 28, 2012

Charms of the Witching Hour

This has turned out to be my LUCKY week!  I was the lucky winner of not only the fabulous $50.00 gift certificate at Simon Says Stamp but also chosen as one of the top three for my entry below.  Thank you Simon Says Stamp. I have wasted no time spending my prize money.  When the UPS truck arrives I will be sharing some new projects.


With Halloween upon us I decided to get in one last project.  This is such a fun time of year and there are so many themes to go with.  Over at the Simon Says Stamp Blog the challenge theme was something using Wendy Vecchi. Wendy is having a very busy time lately as she is also featured on the eclecticPaperie Blog Hop this week. I dug around in my stash and came up with Wendy's Art Parts Pocket Watch, after a little more digging I found a great piece of Graphic 45 Paper called Charms of the Witching Hour.  Since I love anything clock related I think you can guess where this is going.  It was great fun.


It is a real battery operated clock.  I started out with the Wendy Vecchi Pocket Watch using both the solid one on the back and the die cut to layer on the front.  I used copper embossing powder on the front.   After cutting out the paper and clock I layered them on the front.  Next I drilled a hole in the center for the clock works. 

The large pumpkin on the side is not attached but thought it looked cute for the photo. It is made with 6 Rosettes, a Tim Holtz Die. I made the 6 rosettes (2 of each size) and stacked them with the 2 largest ones in the center and used the graduating sizes on top and bottom.  The pumpkin, leaves, fence, clock, tree, witch and bat are all Tim Holtz dies.

In order to make the clock stand up I made a stand out of black chipboard.  The platform is a Stampin Up Die - Top Note. 

Here are some photos of the back so you can see the construction.