Thursday, November 13, 2014

All Sewn Up

Hi all my lovely blogger friends,

The theme over at A Vintage Journey is "All Sewn Up" chosen by the talented Brenda.
I have lots of sewing related items "sew" I was very happy to see the topic for this challenge.

Today I am sharing a birthday card for my wonderful mother.  It is a standard A2 card but by the time I finished I had some weight on it.  I will take it to her personally so don't need to worry about postage.

This post turned out to be way longer than I originally thought so you may need a beverage and a snack.  Sit back and relax.

I had some lovely paper in my stash from, I believe, Lost & Found.  It has a solid side and on the other is some beautiful glittered designs and more sewing related items that are printed on.


When I make something for the first time I always make a template to be sure I get the measurements right.  I made mine from some scrap white paper.


When I was sure what I wanted to do I got out the paper.
 
 
I cut my paper 12" X 5.5" and then scored it at 3.75", 8" and 8.25".  The quarter inch space is needed for the thickness of dress form using the Honey Pop Paper.
 
 
This paper is lovely but it has a white core so did some edging with Walnut Stain Distress Marker. 
 

I used a Flip It Die from Sizzix #659178.  Flip It's are lots of fun but for this card I needed a little more real estate so made some adjustments along the way.  I cut the paper so it was the same height as the die 5.5" and slide it into the die avoiding the ends which I did not want to cut.  I used the magnetic platform but also used a small piece of washi tape to hold everything where I wanted it. 


You can see from the photo above I used an On The Edge Cutting Pad so I only got the cuts that I was looking for.  The die makes the score lines for you so it is easy to fold with the flip tabs on the front as shown below.

 
I used Tim's Sewing Edge Die on the other end.


Next I added my inside panel using some of the decorative paper and some manila cardstock.  After that I added the dark panels on the squares.  The decorative die came in the die set.  I then did the same to the front using light panels.
 
 
Next came the dress form.  I used a stamp that I made from cutting out the dress form, then cutting away the parts I wanted, from the Sewing Room Die using Fun Foam and then using that as a stamp.
 
 
I have already added my sentiment so I could get the dress form positioned right.
Next comes the dress form -
 
 
For this I used Honey Pop Paper from Inky Antics, if you haven't tried this, you need to.  I cut the dress form out and then cut it in half because you only need half for this method.  On both sides of the dress form I added adhesive, I used double back tape because it is strong and thin.
 
 
Remove the tape from only one side and line it up with the score line at the 8" mark.  Then remove the tape from the other side and fold the flap over on the sticky surface being sure you have that quarter inch strip at a 90% angles, like a book binding.
 
All that is left is the decorating.  I added some details to the scissors and then added a couple of buttons and then added some Vintage Photo to the dress form using a Distress Marker.  I stamped on the needle and thread and called it done.


Thanks for stopping by and I love to hear your comments.
 
That just about sews it up. Have a great weekend-
 

Christmas Joy

Hi Everyone,

I just finished making a card for two challenges at Simon Says Stamp where the Monday Challenge is Ornaments, and the Wednesday Challenge is We're Seeing Stars.  I used Karen Burniston's Ring Accordion Die Set along with the Ring Frame Edges. I also used one of Tim Holtz's Mover and Shaper Dies, Mini Wreath.


Just a quick post for today, hope you enjoy -

Monday, November 10, 2014

Red, White 'OR' Blue

Hi my friends,

This month I am playing along again with Karen Burniston's monthly challenge.  I thought the theme sounded like fun.  At first I thought it was Red, White & Blue but then kept reading the challenge description and saw that it is OR not AND.  Karen is allowing us to use one neutral so I chose silver to go with my blue.

I love the new dies from Karen's collection but my favorite is the Clocks and Gears.  She designed this one because of a request from Shelly Hickox - thank you Shelly.

I was feeling a little silly today and had an idea for this card using the Gears and the Sprial Circle Pull Card Die.  Of course Hoppy the Frog is right there taking the spotlight.  He is on one of the Art Impressions "Action Wobble" springy things.


HERE'S HOW I DID IT
 

I usually make a template to check my measurements before I cut into the paper I intend to use.  As you can see, it took me a couple of tries to get what I wanted which was to have the circles overlap on the front of the card.


I started with an 8.5" X 11" paper and cut it to 5.5" X 11".  I scored it at the 4" mark and the 7" mark leaving  a 3" center section.  After I die cut the card, I decided to make it only 5 " tall so cut 1/4" off the top and bottom, ending up with a 5" square card.


I lined the center nubs of the die with each score line 1/2" from the top with the circle portion going toward the outer edge each time.


Since I wanted the circles overlapping on the front I didn't have room for the little notches.  I placed the cutting pad only over the portion of die that I wanted to use.  I like to use an On The Edge Cutting Pad for this but if you don't have one you can slide the cutting pad up so you only cut the portion of the die that you want.


So now all that is left is to decorate and that's always the fun part.  I used the gears from the die set, some metal ones from my stash and also some stamped and embossed images.  I wasn't sure about a blue frog but as it turned out - Hoppy is cute in any color.  I then embellished his eyes with gears and rhinestones.


Hope you've enjoyed my card as much as I enjoyed making it.
Have a great week and "Be Hoppy".
 

Wednesday, November 5, 2014

Season's Greetings

Hi Everyone,

Just dropping in for a quick post to share a card I made today.  It is for someone special and I'm rather pleased with the result.  I think it is simple yet elegant. 
 
I used my Karen Burniston dies and the sentiment die from Elizabeth Craft Designs.
 

Here is a look at it before I connected the tabs.  I used several layers of blue under the snowflake.


Enjoy and I hope you have a wonderful week, at least what's left of it.
 

Thursday, October 30, 2014

Bountiful Harvest at A Vintage Journey

Hi everyone,

It's my turn to host the challenge this time over at A Vintage Journey and I chose Bountiful Harvest as the theme for this fortnight.  The Creative Guides have provided some spectacular inspiration - a feast for the eyes - hope you will come by for a look by clicking here.
 
Halloween will soon be a fond memory, I hope you have lots of cute and scary Trick or Treaters at you door.  It is now time to think about the Bountiful Harvest that comes in November and how we celebrate it.   I would love for you to join in and show us your creativity.  Simply let your mind wander off to those crisp fall days.

For my project I choose to use the colors and images of fall. I made a shadow box using a canvas, just used the reverse side. I invite you to come along with me to the "Paper Pumpkin Patch".  Fall is also the current topic over at Frilly and Funkie so I will share my pumpkins over there as well. 


I started out simply enough by gathering all my pumpkin dies and found that I had lots more than I realized.  I'm sure I have mentioned in the past that orange is my favorite color and there is something about a pumpkin that attracts me every time.


Now I thought I would cut all my pumpkins from grunge paper so they are sturdy.  I got all of them cut out and then decided that I would add Gesso so the color stayed true.  Well, that was a great plan until I started to add ink.  I inked my first one with Distress Ink - the ink never dried, well dahhhh!! By adding Gesso I made the surface non porous which means that water based inks will not work.  This discovery lead to many experiments and I have to say there were many "Happy Accidents".  I got out all sorts of inks, Archival, Alcohol and Staz-On.  I even edged with Sharpies.  They all worked great so then of course I had to get out my Distress Paints, also great for this project.  The only trouble with this is that soon my work table looked like this.  OMG, I had to stop and clean up.

 
Who knew that so many shades of orange could be made?  Sorry I don't have a photo of all the pumpkins before I added them to the shadow box but I guess I got caught up in the moment.  For the one shown below, I used a stencil and molding paste.  I ended up cutting off the stem to make it look as though you were looking at it from the top.
 

Lets just say that I did lots of experimenting and inking.  Sometimes I would paint over the entire pumpkin and start over to get what I wanted.  I used lots of stencils from Tim's collection and used molding paste on some.


I have to say that this was rather fun.  I used dry embossing on some and embossing powder on others.  There are no two alike in this Paper Pumpkin Patch.


Next I lined the inside of the shadow box with a soft blue paper and then added a piece of resin paper that I made for  Destination Inspiration - Ice Resin.  You can see the complete tutorial by clicking here.  The resin makes the paper transparent and lets the blue show through.
 

  Next came the frame which I cut out of strong cardstock, embossed with Tim's Letterpress Embossing Folders - I used, together, happiness, grateful and celebrate.
After mitering the corners, the edges were inked with DI and put on the canvas.

After my frame was ready- I got the pumpkins and I have to say I rearranged them several time before coming to the final decision.

When my pumpkins were just the way I wanted them I had to go looking for leaves and such.  Once again I was amazed at how many dies I had with leaves.  I cut leaves and flourishes and arranged them among the pumpkins until I was happy.

When it came time for the photo I went in my stash of holiday décor and found some more paper pumpkins that I made in previous years and added them.  I'm pretty happy with the result and hope you like them. 


This post turned out to be much longer than I planned but I hope you enjoyed it and will stop over at A Vintage Journey to see all the fabulous work done by my wonderful team mates.

Have a wonderful and creative weekend,

S@ndy

Thursday, October 23, 2014

Compendium of Curiosities - Book of Spells

Hi Everyone,

I've had this project in the works since the challenge was first posted over at Studio L3 but somehow other things got in the way of the completion.  So here I am on the last day and I have finally finished it.  I like that challenge #13 happened to fall in October just before Halloween. I'm hoping to snag the wonderful prize offered by the sponsor of this fun challenge - Inspiration Emporium or perhaps some goodies from Tim and Mario.


I had the Worn Cover in my stash so got that going by tearing some of Tim's Tissue Wrap and gluing it on in random places. I didn't want to cover the entire thing so that some of the design of the cover showed through.  I did some spraying using Lindy's Stamp Gang Sprays.


When the sprays were dry I used some molding paste and some of Tim's great stencils to add texture to the panels.  I used some Distress Paint with stencils too.  Then I sprayed some more.  I finally added the face which I made of Ice Resin.  You can see a complete tutorial on Ice Resin by clicking here.


I had some Grunge Board letters and parts so started laying them out.  At the end I  moved the hinges.  I colored my letters and then added Glossy Accents over the top to add shine and demention.


I decided on red so the cover would have color balance and it also looked like blood.


Next I ran some Linen Ribbon through the holes in the side and tied a knot.  Then I added a Chain Clasp so I could hang some things later.  I was going to hang the Monocle with the eye at the end of the clasp but then I thought that it would look funny as a real  monocle!  Sometimes I just don't know what happens to my brain when I'm working on a project.


I wanted the face to be that of a 'mad scientist' so needed to add a few elements that looked like a laboratory.  I cut out the small bottle from the Apothecary Die and trimmed it down a little.  I then colored it with DI and covered it with Glossy Accents.
I filled some Corked Vials with stuff I had hanging around.  Some micro beads and some glitter.  I used rub-ons on the vials then glued them on top of the head.  I had some space left on the left side so added a light bulb - what a bright idea! I feel like the mad scientist.


Ok folks, that it for this challenge - I hope you have enjoyed my science experiment and will try one of your own.

Have a crafty weekend,
S@ndy


Thursday, October 16, 2014

Halloween - to die for @ A Vintage Journey

 
Hi All,
 
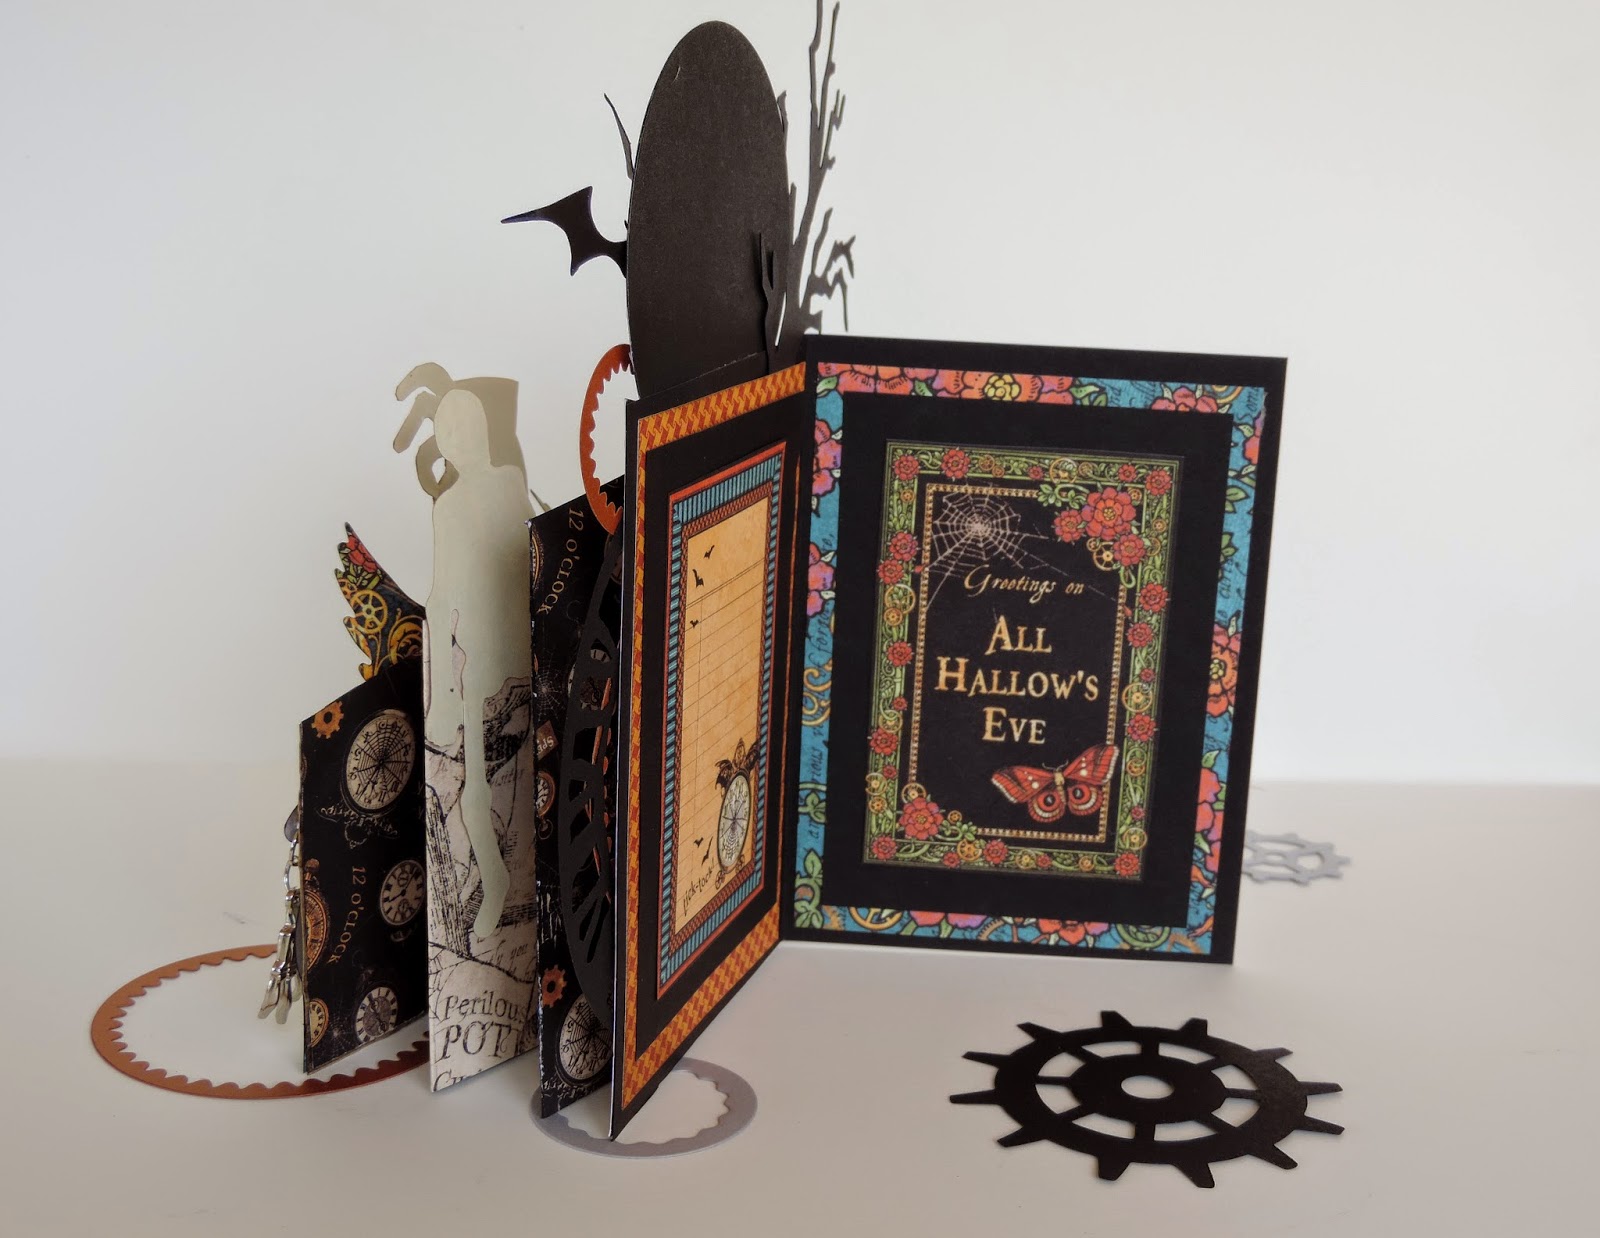
Today I get to share a card made with one of  my favorite Graphic 45 papers, "Steampunk Spells".  
 
When our lovely host, Anne, over at A Vintage Journey told us her theme for this fortnight is - " Halloween - to die for" -  I was excited to get started.  In addition to some fussy cutting I used lots of dies for this one.  Tim's influence is clear with all the great dies I used from his collection.  


Shown below is the inside of the card with lots of real estate to write your message.


I haven't made a cascade card for awhile so thought this would be a good time to revisit this great style.  Shown below is the base of the card.  You can see a complete tutorial on the construction of this card by clicking here.


As in all projects, some changes have been made along the way, in the end, I changed the color of the front panel to a kraft color. 

I began to gather my elements using the Steampunk Girl from Steampunk Spells and the moon from the Happy Haunting Collection. 


No Halloween Card would be complete without a skeleton so used this one from Tim's collection with the stamp and die to match.


After I cut out my steampunk girl, I thought she faded into the background too much so placed her on some manila cardstock and then cut her out again.  Then added some Vintage Photo DI around the edge.


After cutting out all the elements that I wanted for my card I started adding them.  I have provided you with a complete list of the dies I used at the end of the post.
 
 
For the clock I cut the mini pocket watch, cut a gear from black and added the cobweb clock from the paper and then added an epoxy dot that had already turned yellow from sitting in my stash for so long.  I added a charm that I found of a hand. 
 
 
Well, there you have it - hope you've enjoyed my card and you will have a "Halloween - to die for".  Have a great weekend.


From Sizzix and Tim Holtz
 
Circle Framelits
Branch Tree
Mini Pocket Watch
Candlelight Fright
Mini Gears
Stamp & Die Set
Mini Bat & Skeleton Set
Weathered Clock
Heart Wings
 
From Spellbinders
 
Springly Sprockets