

Hi my crafty friends, I'm excited to tell you about this amazing blog hop. Karen Burniston and Pear Blossom Press has joined up to bring you some awesome projects and a chance to win some fabulous prizes.
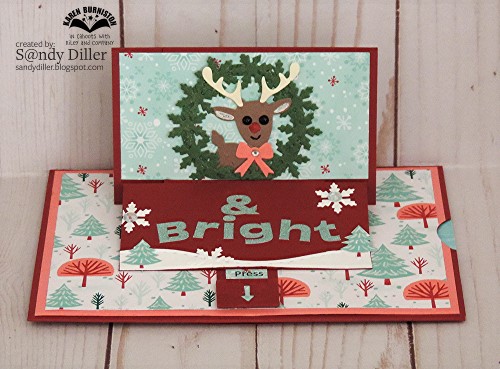
Our goal for this hop is to combine Karen's Pop Up Dies with Amanda's fun lights to make a Light Up/Pop Up card. My card is shown below, to see how I made it just keep on reading to the end where I have full instructions and photos as well as links to all the products I used.
So let's get going - have fun.
I used the Frame Pull Pop Up for the main part of my card but as you can see, I made a few alterations and it worked just fine. Once I added the Pear Blossom Press lights my little reindeer really came to life.


I used the Frame Pull Pop Up for the main part of my card but as you can see, I made a few alterations and it worked just fine. Once I added the Pear Blossom Press lights my little reindeer really came to life.


Thank you so much for hopping along with us on the Karen Burniston and Pear Blossom Press Collaboration Hop! Be sure to comment along the way to be entered to win one of two great prizes:
- Snowman Twist Circle Die Set with a 5-pack of EZ-Lights, or
- Cake Pop-Up Die Set with a 5-pack of EZ-Lights!
Now don’t worry if you aren’t drawn as one of the winners; we’ve got a special gift for everyone! Just enter the code POPANDLIGHT for 15% off your purchase at karenburniston.com or pearblossompress.com. One code works for both shops! (Coupon code valid until November 2, 2019.)
Sandy Diller (you are here)
Prizes & Official Contest Rules
Two prizes will be awarded to two separate winners, chosen at random, from comments left on participating blogs and videos. No purchase necessary. Comments must be posted by 11:59 pm PDT on October 26, 2019. Only one comment per blog or video will be counted, but you can comment on multiple blogs and videos in the hop for additional entries. (This is to prevent spam.) Contest open internationally to participants over 18 years of age. Void where prohibited by law. Any personal information collected will only be used for the purposes of contacting winners, your information will never be shared or sold. Comments left on YouTube videos must not violate community guidelines. This contest is not sponsored by YouTube. Winners will be announced on November 28, 2019 here and prizes must be claimed within thirty days of announcement, or new winners will be drawn.
Now that you've seen the wonderful creations from these talented makers - I'm happy to share how my card came together.

I knew from the start that I needed some extra real estate so I made my card a 5" X 7". In order to hide the light battery pack and a gift card I made my card a double fold with an extra tab to close it. I started out with a piece of red cardstock that measured 7" by 10.5" with a score at 5" and 10" to make fold and the tab. I then angled the ends of the tab. I used some great designer paper from Stamp' Up.


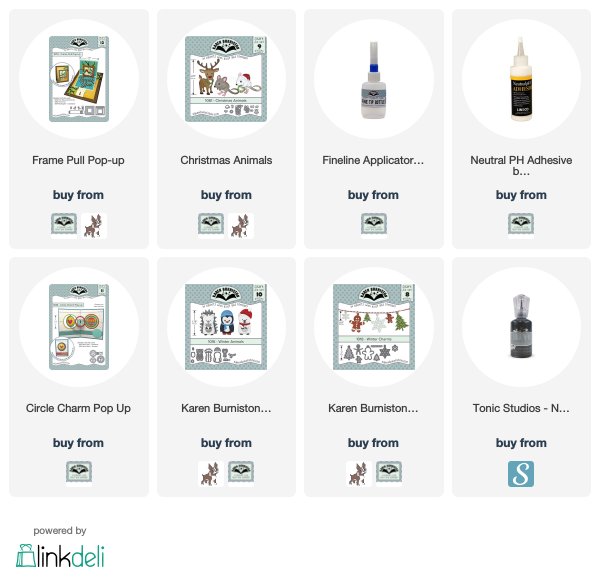
I used the Frame Pull Pop Up to begin with. To see how to assemble this die set click here for Karen's video.

For the extra real estate I cut two more red panels. I decided on a 4.5" X 2.5" for the front panel and a 4.5" X 2.25 for the bottom. At this point I only attached the top (or front) panel.

No card could be complete without some adorable animals. For this I used the Winter Animals and the Christmas Animal die sets. For this card I had to trim off the deer's legs (poor little guy). I used Nuvo drops for all the eyes on the animals and then for the nose of the deer, I used a hole punch for a larger nose and then backed it with some vellum that I colored red with a marker.

To make the wreath, I used the ring from the Circle Charm set and then cut off the little tabs. I used this circle because it was the size I wanted and it had the opening in the center. I then cut 12 snowflakes from green and glued them to the circle. The bottom was cut flat to fit in the card.

I used the computer to generate a phrase that says "May Your Days Be" and printed it on patterned paper. I did the same for the little tab that says "press". The "Merry" from the Merry Christmas die set was used in addition.
 For the "& Bright" part, I was lucky to find the perfect color glitter paper in my scrape bin so used my electronic cutter for that part.


Here you can see how I punched the holes and then ran the wire. The lights were held in with tape.

The Pear Blossom Press lights that I got come 5 light strings in a pack that you break apart. Each one has three little lights that you can use together as I did or separate for more lights on your card. I even tried to see if they work individually and - they do! You could cut off one or two strings and the other one still works. The wires are nice and long so you have plenty of room to work.

Next came the wiring for the lights and it couldn't have been easier. I used a hole punch to make the holes for the lights. The front panel is shown above - once the lights were taped in place where the of the deer I simply placed the front panel over the holes leaving the top part of the panel without adhesive. All three lights were used behind the nose of the reindeer. Once the lights were in place I moved on to the inside of the card.

For the inside panel a piece of patterned paper was cut just a little smaller than the red panel which makes it 4.25" X 2.25". The reindeer and wreath were put in place and then before attaching the wreath to the panel a hole needs to be made just under where the nose will be. This hole can be slightly larger than the nose but, of course, not larger than the head.


Next the battery was added, it is included in the kit, and just slides in and is held securely.

It was at this point that I had an oops moment. I had forgotten to make a hole in the card base for the wires but it was no problem with card as I could make the hole and cover it with the Frame Pull portion. Once I had that done I ran the wires and the taped them down with tape.


Once I had all the major parts in place I added the finishing touches, I used the Outdoor Scene die set for some snowbanks, fussy cut some trees from the paper and dressed up the animals with some of the charm sets. I hope you have enjoyed seeing my Merry & Bright card and will hop around to the rest of the sites and make comments so you can win some prizes. Even if you don't win one of the big give a ways - you still get a prize by commenting which is a 15% discount.
Have fun and until next time, stay crafty,
S@ndy
Adorably sweet! TFS
ReplyDeleteI love how you made Rudolph's nose light up with all three of the lights! Triple bright!!!
ReplyDeleteAdorable that Rudolph s nose lights up ❤
ReplyDeleteSandy, this is fantastic!!! And I love that it's a gift card holder too. What an amazing gift this will make!
ReplyDeleteSuch a fun card - love that light up nose. Great tutorial too!
ReplyDeleteRudolph’s nose lights up — amazing. 😁
ReplyDeleteRudolph is absolutely adorable and what fun it is to push and make his nose light up. Very clever to add a spot for a gift card. Great card and thanks for sharing :)
ReplyDeleteYour video was great with the cool GC hidden and the light up nose on Rudolph - TFS
ReplyDeleteYour card is so cute, it makes me chuckle when I see you light up his nose!!! :)
ReplyDeleteLove love the light up reindeer nose
ReplyDeleteLove Rudolph's nose!
ReplyDeleteSo cute!!!!
ReplyDeleteA very fun card! Love Rudolph's light up nose and the gift card holder.
ReplyDeleteSo much to do & touch on your awesome design, Rudolf is uber cute & the hidden gift card as well, brilliant x
ReplyDeleteLove Rudolph’s nose! So cute.
ReplyDeleteThanks for sharing
I love it!
ReplyDeleteI like how you focused the lights to one spot.
ReplyDeleteSo festive and cute, who doesn't like a lit up Rudolph! Thanks for sharing!
ReplyDeleteSo fun! Love that light up red nose!
ReplyDeleteLove this card. The Rudolf nose is adorable
ReplyDeleteFabulous card
ReplyDeleteMarisela Delgado said: Cute cards. mariandmonsterd@yahoo.com
ReplyDeleteThis is adorable and perfect with the light up nose.
ReplyDeleteSo cute. :)
ReplyDeleteLove Rudolph's light up nose! So fun! Thanks for all the detailed photos! It sure helps!
ReplyDeleteCan't wait to try this one Love It
ReplyDeleteHi Sandy :) Your cards are whimsical and delightful!!! Thanks for the inspiration :)
ReplyDeleteRudolph is so cute and love his lit up nose! Great card thanks for sharing xox
ReplyDeleteSuper fun! What a fabulous way to give a gift card. I can see why you can't stop playing with the card.
ReplyDeleteSuper cute! I love the DP and the little critters. This is great.
ReplyDeleteThe lights are just fabulous! Pop ups and lights, what could be better.
ReplyDeleteCarol b
Love that the lights are bright enough to show up in the photo. Makes a great card fabulous!
ReplyDelete